Use Mongo and Prisma Views
Tutorial length: 10 mins.
This tutorial will show how Mongo and Prisma Views can query unified data across collections without building a separate data pipeline.
Prerequisites
This tutorial assumes you have gone through Supaglue's Quickstart and will use the following technologies:
- MongoDB
- Prisma
- Typescript
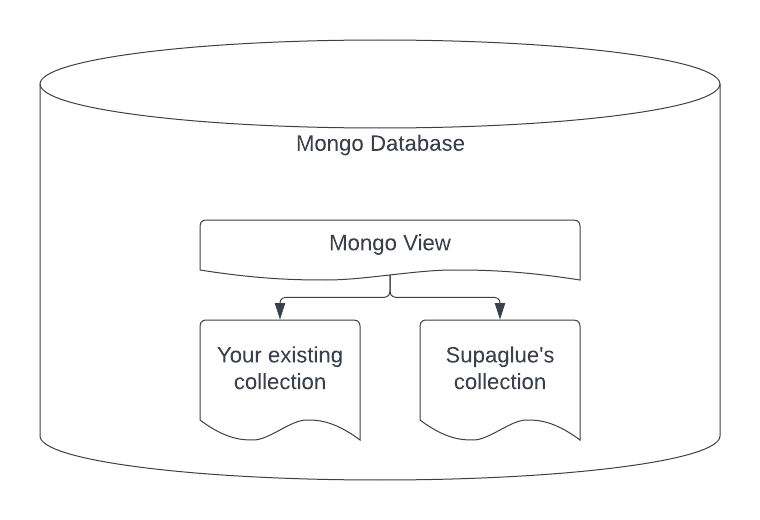
Your collection and Supaglue's collection
Let's view the two collections we will work with. In this tutorial, we'll be using "opportunity" objects:
Your existing collection
opportunity:
{
  "_id": { "$oid": "64c2e36b54c671575f52b3ee" },
  "userId": "customer-0",
  "accountId": "16345966219",
  "forecast": "Open",
  "isWon": false,
  "isClosed": false,
  "entityId": "12520998581"
}
entityId: your customer's opportunity ID in their third-party Provider (e.g. Hubspot). This is the opportunity join key.userId: your customer's ID.
Supaglue's collection
entity_Opportunity:
{
  "_id": { "$oid": "64c03698f2d92a729822de9e" },
  "_supaglue_application_id": "81451ca4-1f22-42c5-9efa-a17006fef973",
  "_supaglue_provider_name": "hubspot",
  "_supaglue_customer_id": "customer-0",
  "_supaglue_emitted_at": { "$date": { "$numberLong": "1690318487624" } },
  "_supaglue_is_deleted": false,
  "_supaglue_raw_data": {...},
  "id": "12520998581",
  "name": "my first deal #2",
  "stage": "closedwon",
  "createdAt": "2023-03-14T00:13:48.543Z",
  "updatedAt": "2023-07-18T22:33:43.791Z",
  "archived": false,
  "associations": { "line items": ["6159961207"] }
}
id: your customer's opportunity ID in their third-party Provider (the same asentityIdin your collection). This is the opportunity join key._supaglue_customer_id: your customer's ID.
The target collection
We want to create a view that preserves your collection's fields while unioning it with Supaglue's fields based on the entityId/id join key.
The view, OpportunityView, will look something like the following:
{
  "entityId": "14364132699",
  "name": "My deal",
  "closeDate": "2023-07-31T20:00:29.291Z",
  "amount": "50000",
  "stage": "appointmentscheduled",
  "pipeline": "default",
  "dealType": "newbusiness",
  "priority": "high",
  "userId": "1",
  "accountId": "16345966219",
  "forecast": "Open",
  "isWon": false,
  "isClosed": false
}
Create the Mongo view
We will use Mongo's CLI, mongosh, to create a view named OpportunityView.
use('<your db name>');

db.createView('OpportunityView', 'opportunity', [
  {
    // left-outer join between `opportunity.entityId` and `entity_Opportunity.id`.
    $lookup: {
      from: 'entity_Opportunity',
      localField: 'entityId',
      foreignField: 'id',
      let: { opportunity_userId: '$userId' }, // alias for pipeline filter below.

      // post-join filtering on matching customer IDs.
      pipeline: [
        {
          $match: {
            $expr: {
              $eq: ['$$opportunity_userId', '$_supaglue_customer_id'],
            },
          },
        },
      ],
      as: 'SupaglueData',
    },
  },

  // deconstructs the SupaglueData single-element array field.
  {
    $unwind: '$SupaglueData',
  },

  // merges the SupaglueData fields into the root document,
  // with the later values in the array taking precedence, e.g. $$ROOT.
  {
    $replaceRoot: {
      newRoot: {
        $mergeObjects: ['$SupaglueData', '$$ROOT'],
      },
    },
  },
  // optional: sets `aCopyOfEntityId` to the joined SupaglueData's `entityId`.
  // when this is used in conjunction with $project below, you can rename fields.
  {
    $set: {
      aCopyOfEntityId: '$entityId',
    },
  },
  // removes fields we no longer need from the joined SupaglueData document.
  {
    $project: {
      SupaglueData: 0,
      id: 0,
      entityId: 0,
    },
  },
]);
Generate the Prisma client
To generate a Prisma client from the Mongo view OpportunityView above we will need to do two things:
- Enable the views preview feature in Prisma
- Author the Prisma schema
- Generate the client
1. Enable views preview
In your schema.prisma file, add the following:
generator client {
  provider        = "prisma-client-js"
  // enable views
  previewFeatures = ["views"]
}
2. Add a Prisma view
In your schema.prisma file, add the Prisma view definition:
view OpportunityView {
  id        String  @id @map("_id") // required for prisma to work
  name      String
  closeDate String
  amount    String
  stage     String
  pipeline  String
  dealType  String
  priority  String
  userId    String
  accountId String
  forecast  String
  isWon     Boolean
  isClosed  Boolean
}
3. Generate the Prisma client
Finally, run prisma generate to regenerate your client with support for the view.
Now you can use your Prisma client like you usually do, e.g.:
const results = await prismaClient.OpportunityView.findMany({
  where: {
    userId: 'customer-0',
  },
});