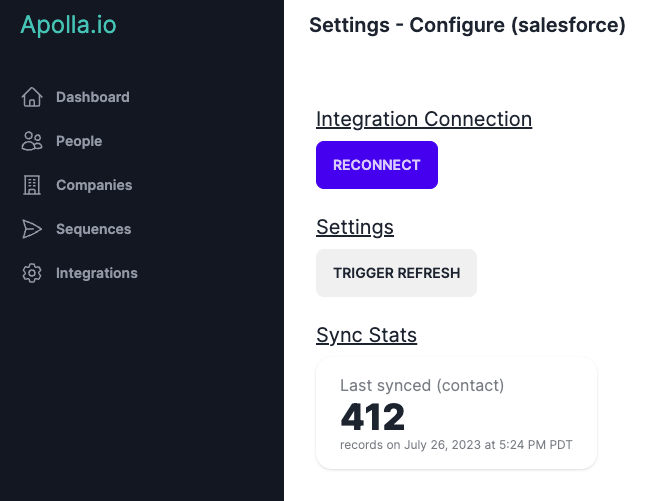
Build a settings page
This tutorial will show how to build an integration settings page for Salesforce in your frontend web app for customers to view sync stats and manage running syncs.
Prerequisites
This tutorial assumes you have gone through Supaglue's Quickstart and will use the following technologies:
- Typescript
- Nextjs 13
- SWR
- Tailwind css
Sync and SyncRun
A Sync is an instance of a sync configuration. Syncs are either paused or running.
A SyncRun is an execution of a Sync. Triggering a Sync creates a SyncRun and can be in the following states: SUCCESS, FAILURE, IN_PROGRESS.
Show sync run stats
You can use the SyncRuns Management API to get the latest SyncRun for a Sync. The response will include the SyncRun's status, the number of records synced, and other metadata about the SyncRun.
Below we use a Nextjs Server Component to fetch the latest SyncRun for a Sync and display the status and number of records synced for an object, contact.
You will need a Supaglue API key to call the Management API. You can obtain one by following these steps.
export async function fetchSyncRun() {
  const syncRunResponse = await fetch(
    `https://api.supaglue.io/mgmt/v2/sync-runs?object=contact&object_type=common&page_size=1`,
    {
      headers: {
        'Content-Type': 'application/json',
        'x-api-key': process.env.NEXT_PUBLIC_SUPAGLUE_API_KEY,
      },
    }
  );

  const syncRun = await syncRunResponse.json();
  return syncRun.results[0];
}
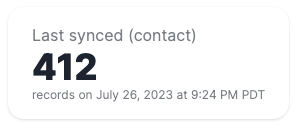
Use the SyncRun to render the number of records last synced:
<div className="stat">
  <div className="stat-title">Last synced ({syncRun.object})</div>
  <div className="stat-value">{syncRun.num_records_synced}</div>
  <div className="stat-desc">records on {syncRun.end_timestamp}</div>
</div>
In this example, we make use of Daisy UI for styling. You can use any styling library you prefer.
Pause/resume/trigger syncs
Many applications want their customers to be able to pause/resume/trigger syncs. Use the Syncs Management API for this.
Since we need to allow the user to click the button, we will use a Route Handler to call the API.
// app/api/trigger-sync/route.ts

import { API_HOST } from '@/lib/constants';
import { NextResponse } from 'next/server';

export async function POST(request: Request) {
  const data = await request.json();

  const res = await fetch(`https://api.supaglue.io/mgmt/v2/syncs/_trigger`, {
    method: 'POST',
    headers: {
      'Content-Type': 'application/json',
      'x-api-key': process.env.NEXT_PUBLIC_SUPAGLUE_API_KEY!,
      'x-customer-id': request.headers.get('x-customer-id')!,
      'x-provider-name': request.headers.get('x-provider-name')!,
    },
    body: JSON.stringify(data),
  });

  const responseData = await res.json();
  return NextResponse.json(responseData);
}
We will use Client Component to handle the button's onClick and call the Route Handler. In this example, we are triggering a refresh on an object, contact.
'use client';
import useSWRMutation from 'swr/mutation';
export default function SettingsPage({ providerName, customerId }) {
const { trigger } = useSWRMutation(`/api/trigger-sync`, async (url, { arg }) => {
return await fetch(url, {
method: 'POST',
headers: {
'Content-Type': 'application/json',
'x-api-key': process.env.NEXT_PUBLIC_SUPAGLUE_API_KEY,
'x-customer-id': customerId,
'x-provider-name': providerName,
},
body: JSON.stringify(arg),
});
});
return (
<div>
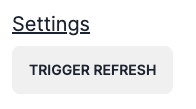
<Header>Settings</Header>
<button className="btn" onClick={() => {
trigger({
perform_full_refresh: true,
object_type: 'common',
object 'common',
});
}}>
Trigger refresh
</button>
</div>
);
}
The button will look like: